
Lazy J Bar C

Wednesday, September 7, 2011
Canning
We decided to take the week off from baking and the Farmer's Market this week to get caught up on some gardening chores and get some canning done. It is hard to be chopping and cooking and running the water bath canner when bread needs attention! Yesterday, I canned 6 pints of Sweet Garlic Dill Pickles and one pint of Pickled Jalapenos. Today, I got 5 pints of Southwest Salsa canned. A couple of weeks ago, I canned 6 pints of Spicy Pickle Relish, 6 pints of Bread and Butter Pickles and 2 pints of spicy Zucchini Relish. The cucumbers in the garden are about played out but the tomatoes are really just starting to come on with a vengeance. I am hoping to be able to put up some plain old canned tomatoes here in the next week or two. The bell peppers and jalapenos are still producing well also and I know it wouldn't hurt Jerry's feelings if I put up another batch of the Southwest Salsa! ;)


Tuesday, September 6, 2011
Chocolate Chip Banana Muffins
These yummy muffins are Jerry's mom's favorites and are made with my Baking Mix. The addition of the chocolate chips really adds some extra special goodness! :) When we went shopping the other day, Harriet bought WAAYY too many bananas, didn't occur to me why until yesterday when she asked if I would make these! LOL!!
2 cups Baking Mix
1 cup sugar
1/2 cup chopped walnuts
1/2 cup semi-sweet chocolate chips
3/4 cup mashed, ripe banana (2 bananas)
2 eggs, beaten
1/2 cup milk
1/4 cup butter, melted
Preheat oven to 400 degrees. In a large bowl, combing Baking Mix, sugar, nuts and chocolate chips. In a separate bowl, combine banana, eggs, milk and butter; add to dry ingredients and stir just until dry ingredients are moistened. Divide batter between 18 greased muffin tins or use paper liners.

Bake for 15 to 17 minutes until golden brown and muffins test done.

Let cool in pan for 5 minutes then remove to a rack to cool completely.

2 cups Baking Mix
1 cup sugar
1/2 cup chopped walnuts
1/2 cup semi-sweet chocolate chips
3/4 cup mashed, ripe banana (2 bananas)
2 eggs, beaten
1/2 cup milk
1/4 cup butter, melted
Preheat oven to 400 degrees. In a large bowl, combing Baking Mix, sugar, nuts and chocolate chips. In a separate bowl, combine banana, eggs, milk and butter; add to dry ingredients and stir just until dry ingredients are moistened. Divide batter between 18 greased muffin tins or use paper liners.


Let cool in pan for 5 minutes then remove to a rack to cool completely.

YUM!!
Monday, September 5, 2011
Calabacitas Casserole Update
Calabacitas means little squash, yet ANOTHER way to use up all that summer squash! I took two different recipes and combined them for this casserole. I originally used zucchini and yellow squash but when I made it Saturday evening, I used some of the Tatume Mexican squash left over from the Farmer's Market. These are a great-tasting summer squash, very prolific, they don't seem to be susceptible to pests or disease, and they grow really well here in the high desert! They are very versatile but my favorite way to prepare them is to slice them into 3/4-inch thick rounds, brush with some olive oil, sprinkle on a little salt and pepper and throw them on the grill! YUM!!

I also added some diced potato, reduced the amount of corn and changed the bread crumbs to crushed tortilla chips to carry through the Mexican theme. I stopped at Bryce Farms on the way home from the Farmer's Market and picked up a bag of fresh roasted green chiles. They grow them every year and then set up the roaster out near the road and sell out just from people driving by and word of mouth. I don't know if ya'll have heard of Hatch chiles from New Mexico but they are regarded as some of the best green chiles in the country. Well, in my opinion, Mr. Bryce's chiles are even better! If you don't have access to fresh roasted green chiles, you can substitute two 4-ounce cans of diced green chiles; they aren't very spicy and add a lot of taste to this casserole so I hope you try them! :)
2 tablespoons oil, divided
2 medium zucchini, diced
2 medium yellow squash, diced
2 small to medium onions, chopped
1 cup diced potato
1 cup chopped roasted green chile
1 cup corn
1 cup shredded Montery Jack cheese (I used goat cheese) :)
Crushed tortilla chips
Preheat oven to 350 degrees. Spray a 2-quart casserole dish with cooking spray. In a large skillet, heat 1 tablespoon of the oil, add the zucchini and yellow squash and cook over medium low heat until soft, about 15 minutes; transfer squash to a large bowl. In same skillet, heat remaining oil and cook onions and potato until soft, about 10 minutes; transfer to bowl with squash. Add green chile, corn and cheese to squash mixture and mix well; season to taste with salt and pepper. Transfer to greased casserole dish.

Sprinkle crushed tortilla chips over the top. Bake in preheated oven for 30 to 40 minutes until bubbly and top has browned.

Sunday, September 4, 2011
Farmer's Market 9/3/2011
I finally remembered to take some updated pictures of my table at the Farmer's Market now that I am able to sell my bread.

The garden is actually starting to wind down so I don't have quite as much produce as I did for awhile. I had to buy a second table to be able to put out all the bread and the produce, the produce table is on the right.


Instead of pricing each individual item, I do my "Menu/Price List." I saw someone else do this once at a market and blatantly stole the idea! :)

Here is a closer view of some of the rolls and Artisan breads.

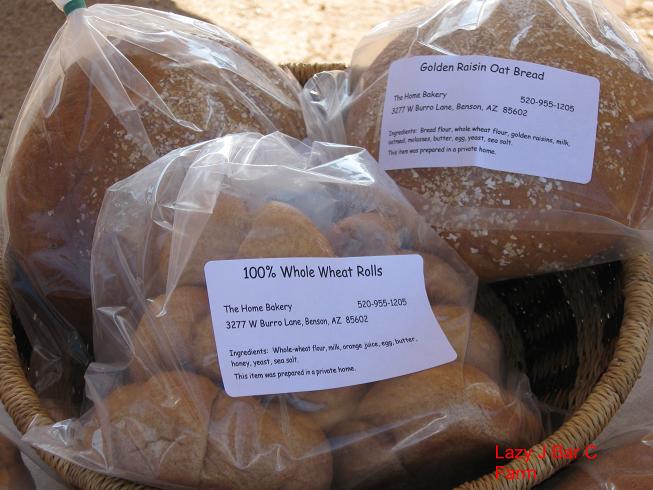
I took 37 items and sold all but 5. I prefer to sell out but I'm still re-establishing my customer base and, this way, we will have some bread for the week! ;) Baking is my passion and one of the reasons I like to do this is the warm fuzzies it gives me when people come back and tell me how much they enjoy my bread! It certainly isn't because I'm getting rich! LOL!! I also sold almost all of the produce! YAY!! Only had a few Tatume Mexican squash left over. They became Calabacitas Casserole served with some homemade tamales. I will update the Calabacitas Casserole recipe tomorrow.
Friday, September 2, 2011
Dairy Goats
First, let me start by saying I LOVE, LOVE, LOVE my goatie girls! :) For a long time, I wanted chickens and dairy goats, now I have both! My Nike and Madeline are Alpines, Abigail is half Nubian half Alpine. They are three generations, Nike, Madeline and then Abigail.
Madeline is my current milker and my plan is to not breed her and milk her through the winter. I plan on breeding Abigail next month and then to start milking her in the spring after she kids. You can read more about the girls and how I got them here: Goat Girls. I have always only milked once a day because there is no way we could use all the milk I get! Madeline kidded on March 29th and this morning, I got over three quarts of milk! I get enough for our needs, all my baking for the Farmer's Market each week, two batches of cheese each week and five quarts for a friend of mine every week! Who needs a cow!!

Everyone has their favorite breed of dairy goat, mine happens to be the Alpines. I have had a Nubian and a Toggenburg and they were both VERY sweet girls but the Alpines really appeal to me. They are quieter than the Nubians; Lydia Sue was a screamer! LOL!! The Alpines give nice, sweet milk; I have heard that the Toggenburgs were bred specifically for milk for cheese making and their milk can be kind of strong. I never actually milked Tara because I didn't need her milk at the time and she wasn't trained. I don't have any experience with Saanens but they look like Alpines only whiter! :) I can't quite get past the ear thingy with the LaManchas but have heard great things about them. There are also Oberhasli and Pygmy dairy goats. Dairy goats have great personalties, are easy to care for and they provide fresh milk that can be used as is or made into cheese, etc. I think they make a great addition to any small farm! :) Besides, the kids are just SOOO darn cute!
Linking to the Farmgirl Friday Blog Hop at Deborah Jean's Dandelion House.
 |
| Nike |
 |
| Madeline |
 |
| Abigail |
Madeline is my current milker and my plan is to not breed her and milk her through the winter. I plan on breeding Abigail next month and then to start milking her in the spring after she kids. You can read more about the girls and how I got them here: Goat Girls. I have always only milked once a day because there is no way we could use all the milk I get! Madeline kidded on March 29th and this morning, I got over three quarts of milk! I get enough for our needs, all my baking for the Farmer's Market each week, two batches of cheese each week and five quarts for a friend of mine every week! Who needs a cow!!
 |
| Madeline likes to let herself into the milking shed!! |
 |
| Before.... |
 |
| ...After!! |

 |
| That's a lot of milk!! |
Everyone has their favorite breed of dairy goat, mine happens to be the Alpines. I have had a Nubian and a Toggenburg and they were both VERY sweet girls but the Alpines really appeal to me. They are quieter than the Nubians; Lydia Sue was a screamer! LOL!! The Alpines give nice, sweet milk; I have heard that the Toggenburgs were bred specifically for milk for cheese making and their milk can be kind of strong. I never actually milked Tara because I didn't need her milk at the time and she wasn't trained. I don't have any experience with Saanens but they look like Alpines only whiter! :) I can't quite get past the ear thingy with the LaManchas but have heard great things about them. There are also Oberhasli and Pygmy dairy goats. Dairy goats have great personalties, are easy to care for and they provide fresh milk that can be used as is or made into cheese, etc. I think they make a great addition to any small farm! :) Besides, the kids are just SOOO darn cute!
 |
| Abigail the day she was born! |
Linking to the Farmgirl Friday Blog Hop at Deborah Jean's Dandelion House.
Wednesday, August 31, 2011
Pear Apple Pie
All of our fruit trees are self-pollinating dwarf varieties and the peach tree is REALLY dwarf at about 4 foot tall and 4 foot wide.
Last year, we had winter rains and more fruit than we knew what to do with. This year, we had NO winter rains and consequently there was nothing for the wildlife to eat. The trees all bloomed nicely, were setting a decent amount of fruit and we had all of them covered completely with bird netting. The first to bear each year is the Santa Rosa plum tree. It had about 40-50 nice plums that I was preparing to harvest in a couple of days because they were almost ripe. The next morning, most of them were gone; the day after that, the rest were gone. Next, the peach tree would be ready to harvest. Something ate the peaches, still green, right down to the pits while still on the branches; didn't get one. Finally, the Kieffer pear tree ripens. Most got pecked and eaten in spite of the bird netting but I was able to pick THREE pears and they were big! Woo-Hoo!! Oh well, glad I wasn't trying to feed my family from the fruit tree harvest this year. Like I've said before, the critters must have needed it more than we did because of the dry winter.
I DID get to make a Pear Apple Pie with a Streusel topping yesterday! :) The three pears yielded almost six cups of fruit so I only had to add a couple of apples. The apples came from my friend's tree.
Filling
Thinly sliced, peeled pears and apples to equal 8 cups
1/2 to 2/3 cup sugar, depending on the sweetness of your fruit
2 tablespoons all-purpose flour
1 teaspoon Apple Pie spice
Pastry for a Single-Crust pie
Streusel Topping
1/3 cup all-purpose flour
1/2 cup old-fashioned oats
1/2 cup brown sugar
1/2 teaspoon Apple Pie spice
1/4 cup butter
Preheat oven to 375 degrees. Line a 9-inch pie plate with the pastry. In a large bowl, combine all filling ingredients and mix well, let stand about 10 minutes to develop juices. Pour filling ingredients into pastry lined pie plate. In a separate bowl, combine flour, oats, sugar and Apple Pie spice; cut in butter until crumbly. Sprinkle over the top of the pie.

To prevent overbrowning, cover the edge of the pie with strips of foil or use a pie crust shield. I bought a set of these several years ago and they make life so much easier!!

Bake for 25 minutes then remove shield and bake for another 20 to 25 minutes until the top is golden brown and the fruit tests done when pierced with a knife.


 |
| Walnut, Pear, Plum, Peach |
Last year, we had winter rains and more fruit than we knew what to do with. This year, we had NO winter rains and consequently there was nothing for the wildlife to eat. The trees all bloomed nicely, were setting a decent amount of fruit and we had all of them covered completely with bird netting. The first to bear each year is the Santa Rosa plum tree. It had about 40-50 nice plums that I was preparing to harvest in a couple of days because they were almost ripe. The next morning, most of them were gone; the day after that, the rest were gone. Next, the peach tree would be ready to harvest. Something ate the peaches, still green, right down to the pits while still on the branches; didn't get one. Finally, the Kieffer pear tree ripens. Most got pecked and eaten in spite of the bird netting but I was able to pick THREE pears and they were big! Woo-Hoo!! Oh well, glad I wasn't trying to feed my family from the fruit tree harvest this year. Like I've said before, the critters must have needed it more than we did because of the dry winter.
I DID get to make a Pear Apple Pie with a Streusel topping yesterday! :) The three pears yielded almost six cups of fruit so I only had to add a couple of apples. The apples came from my friend's tree.
Filling
Thinly sliced, peeled pears and apples to equal 8 cups
1/2 to 2/3 cup sugar, depending on the sweetness of your fruit
2 tablespoons all-purpose flour
1 teaspoon Apple Pie spice
Pastry for a Single-Crust pie
Streusel Topping
1/3 cup all-purpose flour
1/2 cup old-fashioned oats
1/2 cup brown sugar
1/2 teaspoon Apple Pie spice
1/4 cup butter
Preheat oven to 375 degrees. Line a 9-inch pie plate with the pastry. In a large bowl, combine all filling ingredients and mix well, let stand about 10 minutes to develop juices. Pour filling ingredients into pastry lined pie plate. In a separate bowl, combine flour, oats, sugar and Apple Pie spice; cut in butter until crumbly. Sprinkle over the top of the pie.

To prevent overbrowning, cover the edge of the pie with strips of foil or use a pie crust shield. I bought a set of these several years ago and they make life so much easier!!

Bake for 25 minutes then remove shield and bake for another 20 to 25 minutes until the top is golden brown and the fruit tests done when pierced with a knife.

I was really pleased that I got to use the pears for such a yummy pie! :)

Monday, August 29, 2011
Oatmeal Wheat Bread
Some days, I truly feel like I'm living a dream come true! I have my dairy goats, my chickens and my garden and fruit trees. I have a wonderful husband who indulges me in all these things! :) I have my own "business" baking for the Farmer's Market from HOME!! Since I'm at home, I get to go down and feed the chickens their garden/kitchen scraps around 9:30 or 10:00. I'm able to tend to the garden more than if I was away all day. Today, I've got some beans soaking for dinner tonight that we will have with some chicken with some homemade salsa fresca made using ingredients from the garden, guacamole and tortillas. So far, I have six of today's eight scheduled loaves of bread finished, the last two are in the bread machines. I'm even getting to work on crocheting some new dishcloths and potholders! Don't get me wrong, I also have days when I'm TOTALLY exhausted by the end of the day and thinking it would be a good idea to move back to the city! LOL!! I'm sure all you Farmgirls out there can relate! ;)
Anyway, this is my favorite sandwich bread of all the ones I make. I have been making regular Oatmeal Bread (recipe from the back of the King Arthur Flour Bread Flour bag) for a couple of years and thought I would try it with half whole-wheat and half bread flour, I like it even better than the original! The whole-wheat flour gives it kind of a nutty taste. Hope you get to give it a try soon!
1 1/2 cups bread flour
1 1/2 cups whole-wheat flour
1 cup old-fashioned rolled oats
1 1/2 teaspoons salt
1 cup lukewarm milk
2 tablespoons butter
3 tablespoon honey
2 teaspoons bread machine yeast OR 1 packet active dry yeast (If using active dry yeast, dissolve it in the warm milk before combining with the remaining ingredients.)
Mix, knead and let your dough rise until doubled using your favorite method; bread machine, manual or stand mixer. Shape dough into a loaf, put it in a greased pan, cover and let rise in a warm place until nearly doubled. Bake in a preheated 375 degree oven for 30 minutes, cover loosely with foil after 10 minutes.

Subscribe to:
Posts (Atom)