Lazy J Bar C

Lazy J Bar C

Wednesday, May 9, 2012

Green Chile Cheddar Beer Bread


I haven't posted a recipe using my Baking Mix in awhile. The Baking Mix is so versatile, you can use it for everything from Monster Cookies (my new favorite cookie!) to Buttermilk Biscuits to a Cobbler Topping  to Cheesy Biscuit Sticks and don't miss the quick and easy Cinnamon Coffee Cake! If you do a "search" for Baking Mix at the top of the blog you will find even more recipes. :)

I love making beer breads, they go together very quickly and you can get a wonderful loaf of homemade bread on the table in under an hour. I use a light tasting beer when I make beer breads, I don't want the flavor of the beer to be too overpowering. You can also use unflavored seltzer water if you don't want to use beer. I baked it in my favorite 2-quart casserole dish this time for a different presentation.

Green Chile Cheddar Beer Bread

3 cups Baking Mix
3/4 cup cornmeal
1 cup shredded Cheddar cheese
1/2 cup chopped green chiles
12 ounces beer
1 egg

Heat oven to 350 degrees. Generously grease a 9 x 5 x 3-inch loaf pan or a 2-quart casserole dish. Mix dry ingredients in a large bowl, stir in cheese. Add beer, egg and green chiles; beat vigorously. The batter will be "shaggy." Pour batter into prepared pan. Bake for 45 to 50 minutes or until golden brown. Remove from pan; cool for 10 minutes on a wire rack. Serve warm.


Linking up with Heidi for The Country Homemaker Hop. Head on over and check out her cute new hen house and see what all the other Country Homemakers are up to! :)

Sunday, May 6, 2012

Sunday Photo - Cactus Flower


We had just enough winter rain to produce a bumper crop of cactus flowers! :) I can't believe how many buds are on the prickly pear and cholla in our area this year! In the lower elevations, the cactus are already in full flower but we are a bit behind here. The prickly pear in our pasture just started blooming this week. It's funny how you don't really notice things right under your nose sometimes. I went out to take pictures of the flowers this morning but they weren't open yet! Duh, I never really paid attention before that they close up overnight! LOL!!


I just love the cheerful yellow color and delicate appearance of the prickly pear flowers. This particular smallish prickly pear has well over 60 buds on it. I hope to get a picture when most of the flowers are open. :)

Linking up with Madge for Weekly Top Shot, Nancy for Your Sunday Best and Jan for Straight Out Of the Camera Sunday. Check them out for some beautiful photography!

Friday, May 4, 2012

Cowboy Quiche


Jerry is not a big fan of quiche. In fact, he disdainfully calls it "egg pie!" Me, I love quiche and could eat it twice a week! :) I made this recipe for Cowboy Quiche on Easter Sunday when we had company. It is from Ree Drummond's new cookbook "The Pioneer Woman Cooks - Food From My Frontier." I have never been one to make my own piecrust because most people swear that you have to use vegetable shortening to make the best piecrust and I don't use vegetable shortening. I tried the suggested piecrust recipe from this same cookbook and it was wonderful! I will now be making all my piecrusts from scratch! The recipe makes enough for two piecrusts so I have an extra in the freezer now! :)

Pam's Piecrust

2-1/2 cups all-purpose flour
1 teaspoon salt
1 tablespoon sugar
1 cup cold butter, cut into chunks
1/4 cup cold water

Lightly mix 2 cups of the flour, the salt and the sugar in a mixing bowl. Cut the butter into the flour using a pastry cutter. The mixture should look like large crumbs and begin to cling together in clumps. Add the remaining 1/2 cup flour and mix lightly. Do not overmix this flour, it should coat the clumps. Sprinkle the cold water over the dough and with your hands, mix it in until the dough holds together, then shape the dough into two discs. At this point, you may wrap the dough in plastic wrap for storage; it will keep up to a week in the fridge or up to six months in the freezer.
Roll out one disc of the dough between two pieces of parchment or waxed paper until large enough for your pie pan.

Cowboy Quiche

1 recipe Pam's Piecrust
8 slices bacon, fried until chewy
2 yellow onions, thinly sliced (I used one large onion)
2 tablespoons butter
8 eggs
1-1/2 cups heavy cream (I used half milk and half heavy cream)
Salt and black pepper to taste
2 cups grated Cheddar cheese (I used half Cheddar and half goat cheese Queso Blanco)

Preheat the oven to 400 degrees. Line a 9-inch deep-dish pie pan with the crust, set aside.
Chop up the bacon into bite-sized pieces. In a heavy skillet, over medium-low heat, fry the onions in the butter until deep golden brown, 12 to 15 minutes. (I cooked the bacon in the skillet and then cooked the onions in a little of the bacon grease.) Mix the eggs, cream and salt and pepper in a bowl. Add the bacon, onions and cheese, stir to combine. Pour the filling into the pie shell, cover lightly with aluminum foil and bake for 45 minutes. Remove the foil and bake for an additional 10 minutes or until the quiche is set and the crust is golden brown. Remove from the oven and allow to sit for 10 minutes. Serve warm or cold, either way is scrumptious!

Jerry actually ate some of this quiche on Easter AND had a piece for breakfast a couple of days later! He grudgingly admitted that it was "pretty good!" ;~) After all, how can you go wrong with bacon, onions and cheese!

Linking up with Heidi and Deb for Farmgirl Friday and Sall's Country Life for the premier of Farm Fresh Friday. This quiche was made with my Farm Fresh eggs, goat milk and goat cheese. :) I hope you get a chance to check out both of these great blog hops!

Thursday, May 3, 2012

Daphne - Thankful Thursday


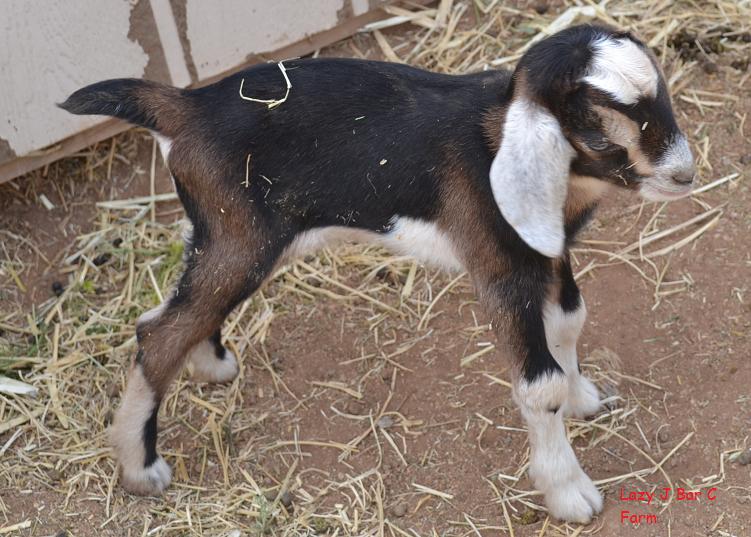
We went yesterday and picked up my new little Alpine doe, Daphne. She is just about the sweetest little goat I have ever seen and I love her to pieces already!!


She bonded with me before we even left the farm where we bought her. I'm sure she will become more independent as she gets used to being here but, for now, I'm enjoying having a "Velcro" goat whenever I go down to the pasture! :)


I put BW in with her in the smaller pen yesterday and last night so that she would have some company. I must say, I'm surprised how small she is compared to BW. She is two months old and BW is just over three weeks old and he is almost as tall as her! Maybe I have freakishly large Alpine goats or something. The lady we got her from has quite a few well-papered Alpines but none of them are as large as mine. My older doe, Nike, is a registered Alpine too and her daughter, Madeline, is purebred but not registered. I would estimate my does outweigh hers by at least 30 pounds and stand a good 6 inches taller! I wish I had taken my camera, the buck was really nice and he was HUGE!!


Of course, Daphne enjoyed climbing on the stairs. All the goats LOVE playing on them, even the older does!


Just look at that face, what a sweetie! Now, I just have to wait for two years to see if she is going to be a good milker! I have high hopes, she is already 200% friendlier than Abigail was at the same age. I am thankful today for my hubby indulging my love of goats and for my sweet baby Daphne! :)
Linking up with Nancy and Lisa for Rural Thursday.

Wednesday, May 2, 2012

Eating Turnips


I LOVE turnips!! I love growing them and I love eating them! :)


They are just about as easy to grow as summer squash, just plant the seeds, keep them watered and be sure to thin them out. My only problem has been ways to prepare them. We can only eat so much mashed potatoes and turnips; although, I could probably eat that every day! ;~) I also like to add them to the slow cooker with carrots and onions when making a roast and even grate them over our salads in place of radishes. I did a search for turnip recipes recently and found one for Scalloped Turnips on one of my favorite sites, Simply Recipes. This recipe is so very easy and so very, very tasty!

Scalloped Turnips

4 tablespoons butter
1/2 cup thinly sliced onions (I used leeks because I had them)
4 cups peeled, thinly sliced turnips
2 tablespoons flour
1 teaspoon salt
Freshly ground black pepper
3/4 cup milk
1/3 cup heavy cream
1/2 cup grated cheddar cheese

Preheat oven to 350 degrees. Butter a 1-quart casserole dish. In a skillet, melt 1 tablespoon butter and lightly saute onions until just wilted.
Layer a third of the sliced turnips in the casserole dish; top with a third of the onions; sprinkle with 2 teaspoons of flour, 1/3 teaspoon salt and one grind of pepper; top with dollops from 1 tablespoon of the butter. Repeat this layering twice.
Mix milk and cream together and pour over the turnips. Cover and bake in a 350 degree oven for 30 minutes then remove cover and bake for another 30 minutes. Top with cheddar cheese and bake for an additional 10-15 minutes or until tender and bubbly.


If you are looking for ways to eat more turnips, I highly recommend trying this recipe! :)
Linking up with Heidi for the Country Homemaker Hop.

Tuesday, May 1, 2012

First of the Month - May

I'm joining Jan at Murrieta 365 for her First of the Month meme all this year. Here are the ground rules per her site: "The goal is to capture one thing repeatedly on the first of each month. It can be a landscape, a person, an animal, a project; whatever your focus is, is fine. It can even be a record of where you are each First of the Month."
I have been focusing on my Alpine doe, Abigail, and her first pregnancy and kidding. Well, we had babies on Easter Sunday! :) Triplets, two boys and a little girl.
 

No. 1 Son

No. 2 Son

Lily

All seemed well until Tuesday. Little Lily was lethargic and wouldn't nurse so I started force feeding her. She died in my arms on Wednesday morning. I still get teary-eyed thinking about it. In retrospect and talking to my girlfriend who was here when they were born, I think Abigail stepped on her and might have caused some internal injuries. Jerry buried her underneath a mesquite tree for me.
 
Again, all seemed well. Abigail was nursing the two boys and being a pretty good mother. Then, on Friday morning, we noticed No. 2 Son was a bit lethargic. I put him over near Abigail so he could nurse but she butted him away. I tried several times but she had rejected him for some reason. He became a bottle baby.
 
    
Since I was now his maaa, I renamed him BW because he is black and white! :)
 
I worked with Abigail every day so that I would be able to start milking her and every day, she would NOT let me touch her udder! As she was eating her grain, I would pet her and talk to her and move my hand down her back with no problem, down her leg with no problem, but when I got to her udder, she would butt at me and run away. This went on for over two weeks and she just wasn't getting ANY better so I made the hard decision to sell her. I love my goats very, very much but I just can't afford to feed a goat that won't let me milk her. I sold her and the two boys to a guy who has bought goats from me before. He and his wife came and picked up Abigail and No. 1 Son this past Sunday. BW is going to stay here for another three to four weeks until he is old enough to be weaned. He is now in with his grandmaaa and great-grandmaaa. Great-grandmaaa, Nike, is sooo good with all the little orphan goats, she lets them hang out and teaches them how to be goats! I'm so glad I have her!
 

Abigail three weeks after kidding, she has her girlish figure back!


BW and No. 1 Son, three weeks old.

On a separate note, we also sold the miniature donkeys, Esmeralda and Mercedes. Hay in our part of the country is still hovering at $20 a bale and despite their cute factor, we couldn't justify feeding them since we now have Dallas as company for Paco. We sold them to a very nice family from Willcox who raise miniature horses. They brought their children when they came to pick the girls up and the kids were instantly in love with the donkeys! Here is one last cute donkey picture.
 
 
Honest to Pete, I've had a pretty rough week emotionally. I feel like a failure with Abigail. If only I had worked with her more when she was young she might have been less "wild." I really miss the donkey girls but know they went to a really good home and we have been invited to visit whenever we are over that way. On a brighter note, I am buying a two-month old Alpine doe tomorrow from one of the girls at the Farmer's Market and I am excited about that. I will post pictures soon! Sorry for such a long post...

Monday, April 30, 2012

Leafcutter Bees


When I was watering the garden yesterday, I noticed that some of the leaves on the snow pea plants had half-moon-shaped pieces out of them.


I knew right off that the Leafcutter bees were building their nests! I worked in the nursery at our local Ace Hardware for a couple of years and every year about this time, new people to our area would start bringing in plants with similar looking leaves. They always wanted to know what was causing this and when we would tell them, they wanted to know what they could do to kill the bees or make them stop. We would tell them that the bees were just building their nests and they would quit "cutting" the leaves in a week or two.


They usually cut my roses or the fruit trees, this is the first year I've seen them on the snow peas. It doesn't hurt the plant and heaven knows, we need all the bees we can get!


They got both sides of this leaf! It was fun to be able to grab my camera and take pictures of them hard at work! :)


In this picture, you can see the cut leaf just above the bee and the piece is grasped in it's legs as it prepares to take it off to the nest! You can read an article about them here.

Linking up with Heidi for The Country Garden Showcase and Lisa for Macro Monday.