Lazy J Bar C

Lazy J Bar C
Showing posts with label Farmgirl Friday. Show all posts

Friday, January 1, 2016

Friday's Hunt 1/1/2016

I'm joining Teresa at Eden Hills for the kick-off of her new meme, Friday's Hunt! This week's prompts are Starts with A, Week's Favorite and Celebrate.

For Starts with A and Week's Favorite I'm sharing a photo of our new Ameraucana rooster. He was the "bonus" chick in an order of Red Sex Link chicks my friend and I got last fall. Isn't he handsome? He kept running away from me but I'm going to work on getting a better picture of him to frame. :)


For Celebrate I'm sharing a picture of the treasures I found at the secondhand store this week. The Corning Ware casserole dish is from the very early 1960s and is called Pyroceram. I had never seen this type before with the solid lid. I felt it was probably a pretty good buy at $12!!  :)


Thanks Teresa for starting this new meme! Hopefully, it will encourage me to start blogging again...at least once a week!

Thursday, March 13, 2014

Chocolate Guinness Cake


Or in this case...cupcakes! :)

I first made this cake and posted about it here a couple of years ago. It is just as good now as it was then so I thought I would share it again for St. Patrick's Day. The recipe was originally posted at Simply Recipes in March of 2012 and is an adaption of a recipe by Nigella Lawson.

Chocolate Guinness Cake

1 cup stout or porter beer                    **Click here to print this recipe**   
10 tablespoons unsalted butter
3/4 cup unsweetened cocoa
1 1/2 cups granulated sugar
1/2 cup brown sugar
3/4 cup sour cream
2 eggs
1 tablespoon vanilla
2 cups all-purpose flour
2 1/2 teaspoons baking soda
1/4 teaspoon salt

Preheat oven to 350 degrees. Grease a 9-inch springform pan and line the bottom with a round of parchment or wax paper and then lightly grease the paper. If making cupcakes, line the pan(s) with paper liners AND lightly spray them with cooking spray.
In a large saucepan, heat the beer and butter over medium-high heat until the butter has melted. Add the cocoa powder and sugars and whisk together. Take off the heat and allow to come to room temperature. (Only takes a few minutes)
In another bowl, beat together the sour cream, eggs and vanilla until very, very well combined. Add to the butter-beer mixture and whisk together.
In another bowl, whisk together the flour, baking soda and salt. Add to the beer-butter mixture and whisk together until it just comes together. Pour into the prepared pan and give the pan a few short drops onto the counter to remove any air bubbles. If making cupcakes, fill each well three-quarters full with batter.
Bake cake for 50 to 60 minutes, cupcakes for 18 to 20 minutes, or until a wooden pick inserted in the center comes out clean. Allow to cool on a wire rack. Run a knife around the edge to separate the cake from the pan, if necessary, and remove the ring from the springform pan.
Frost as desired.

This recipe makes a LOT of batter and would easily make 30 to 36 cupcakes.

I frosted the cupcakes with a classic cream cheese frosting but a chocolate buttercream frosting would also be very good. Here is a photo of the cake I made in 2012.


Sharing with the Down Home Blog Hop, Rurality Blog Hop, From The Farm Blog Hop and Farmgirl Friday.

Friday, March 7, 2014

What I Have Been Up To...


...in between working on my Chicken Applique quilt, getting seeds started in my little greenhouse for this summer, volunteering at the Tombstone Art Gallery, participating in a Farmgirl Craft Swap and regular day-to-day cookin', cleanin' and clothes washin'.

These are 100% Mohair cinches hand woven by little ol' me and available for purchase on my new Lazy J Bar C Facebook page here. Mohair is the lustrous and strong hair of the Angora goat and is a traditional fiber for cinches. It's strong, it breathes and it wicks moisture away from the horse; whereas wool is a natural fiber but holds the moisture in rather than absorbing it and acrylic fibers don't breathe. Plus, it's a beautiful and functional piece of handmade 'wearable art' for the horse.

If you are in the market for a new cinch or know a horse lover who might be interested, I hope you will check out my handmade Mohair cinches. They also make nice gifts.  :)

P.S. I will post an update on my Chicken Applique quilt soon. The back is finished and part of the quilting is done. YAY!!

Sharing with Farmgirl Friday.

Wednesday, February 12, 2014

Chocolate Chip Peanut Butter and Oatmeal Cookies


What is your favorite cookie? Chocolate chip? Peanut butter? Oatmeal? Why not just combine them all in one cookie! :)

We were out of cookies the other day (gasp!) and I was bored with the same old, same old. I remembered a peanut butter cookie with chocolate chips that I had years ago and decided to peruse the internet to see if I could recreate it. Well, DUH, you can find ANYTHING on the internet! LOL!! This recipe is a compilation of several that I looked at and uses my Baking Mix and basic cookie recipe.

Chocolate Chip Peanut Butter & Oatmeal Cookies

1 cup butter               **Click here to print this recipe**
1 cup peanut butter
1 cup brown sugar
1/2 cup granulated sugar
2 eggs
1 teaspoon vanilla
2 1/2 cups Baking Mix
2 cups quick-cooking oats
2 cups semi-sweet chocolate chips

Preheat oven to 375 degrees. In a large bowl, beat together butter, peanut butter and sugars until creamy. Add eggs and vanilla; mix well. Stir in the Baking Mix and oats; mix thoroughly. Stir in the chocolate chips. Drop by rounded tablespoonfuls onto ungreased baking sheets.
Bake for 10-12 minutes until lightly browned.
Cool on baking sheets for a few minutes and then remove to wire racks to cool completely.
Makes about 4 dozen cookies.

Linking up with the Down Home Blog Hop, the Rurality Blog Hop and Farmgirl Friday.

Wednesday, January 29, 2014

Pretzel Rolls


I was looking at the King Arthur Flour website the other day and came across this recipe. I know pretzel buns and rolls are all the rage right now but I haven't had one. I have looked at different recipes for making them but they all seemed a bit fussy, until I found this one! These babies are fabulous; crusty on the outside and nice and chewy on the inside! Jerry told me that this may be the best bread I have ever made! ;)

Pretzel Rolls               **Click here to print this recipe**

Dough
     1 3/4 cups warm water
     2 tablespoons unsalted butter
     3/4 teaspoon salt
     4 1/2 cups unbleached all-purpose flour
     1/4 cut nonfat dry milk
     2 teaspoons instant yeast

Topping
     coarse sea salt or Kosher salt

Water Bath
     2 quarts water
     1 tablespoon salt
     1/4 cup baking soda

Directions
     Mix and knead the dough ingredients - by hand, mixer or bread machine - to make a smooth, slightly sticky dough. Allow the dough to rise in a lightly greased bowl, covered, for about one hour, until doubled. Gently deflate the dough and transfer to a lightly greased work surface. With lightly greased hands, divide the dough into 8 pieces for sandwich rolls or 12 pieces for dinner rolls and shape each piece into a smooth ball. Place the balls on a lightly greased piece of parchment paper placed on a baking sheet, cover and let rest for 15 minutes.


Preheat the oven to 400 degrees

Prepare the water bath: Bring the water, salt and baking soda to a boil in a large pot. Drop 3 dough balls at a time into the water bath. (I should have used a deeper pot) Cook for 30 seconds, flip over and cook for 30 seconds longer.


Using a slotted spoon, return the rolls to the baking sheet. Using scissors or a sharp knife, cut 1/2" deep crosses into the center of each roll. Sprinkle with the coarse salt.


Bake for 20 to 24 minutes or until the rolls are a deep, dark brown. Cover loosely with foil after 10 minutes if necessary so they don't get too brown. Cool completely on a wire rack.


The only problem I have is that after being in a bag overnight, the salt on the tops kind of melted away. Jerry dearly loves bagels and now that I have gotten past the whole fear of boiling bread dough thingy, I think I'll have to give them a try! :)

Linking up with the Rurality Blog Hop and Farmgirl Friday.

Saturday, January 25, 2014

New Bathroom Curtains


So, a couple of years ago, I started crocheting this panel to go in our bathroom window. I've never figured out why they would put an eye-level bathroom window in a house without some type of privacy glass and I realize we could just close the blinds but I don't like keeping the blinds down, it makes it too dark.

Anyway, since I'm 'retired' now, I have been finishing up some craft projects. I used cotton crochet thread that I already had on hand and this used up all of it. I knew I wanted a valance for the top but felt that it needed a little something more; especially since my crocheted panel isn't quite wide enough to go all the way across! (blush)

I thought the addition of the side curtains looked rather nice and hid my oops. We both really like the way the curtains have changed the whole feel of the bathroom. :)

Linking up with Farmgirl Friday.

Friday, January 17, 2014

The Trouble With These Tribbles...


...is that I can't quit making them! :)

Awhile back, Jaime at Ngo Family Farm did a post about knitting these cute little dishcloths/sponges. I had been crocheting my dishcloths using two strands of crochet thread and really liked them but they did take awhile to complete. Since most of my dishcloths were finally falling apart from use, I decided to try this pattern. These little cuties work up quickly and really last a long time. When I'm bored and feel the need to do something constructive, I usually start another Tribble.

You can find the pattern for making them here and a tutorial that is helpful in explaining how to finish them here. The only thing I did differently was to knit one more row at the end of the directions so that I would have a tail for gathering on each side after sewing together. Also, I ran my tail through the center a couple of times to tack everything in place.

These can certainly be used for other purposes too, one girl commented that she liked to use them to wash her face. I hope you give this quick and easy pattern a try but be warned, these Tribbles have a tendency to multiply like crazy! ;)

Sharing with Farmgirl Friday.

Friday, November 22, 2013

Pecan Spice Waffles with Molasses Cinnamon Syrup


Heaven...I'm in heaven... :)

I have been making these Pecan Spice Waffles/Pancakes using my Baking Mix for a couple of years now but teaming them up with this Molasses Cinnamon Syrup sends them right over the top! I found the recipe for the syrup here. The combination of flavors is perfect for the Holidays!

The pancake/waffle mix also makes a nice gift. Just put the dry ingredients into a baggie and then put that down into a fabric bag or gift bag and include a tag with the directions for making the pancakes or waffles. Pair it up with a jar of this homemade syrup for an extra special, homemade gift anytime of year.

Pecan Spice Pancakes/Waffles

1 1/2 cups Baking Mix
2 tablespoons sugar
1 1/2 teaspoons Pumpkin Pie Spice (find the recipe at the end of this post)
1/4 cup chopped pecans
1 large egg
1 cup milk
1 tablespoon oil (for waffles only)

In a medium bowl, stir together the dry ingredients. In a separate bowl, whisk together the wet ingredients; stir into the dry ingredients just until blended. Ladle onto a lightly greased, hot griddle for pancakes or a preheated waffle iron for waffles. Feel free to add a little more milk if the batter seems too thick.

Makes five 6-inch round waffles.

Molasses Cinnamon Syrup

1/2 cup demerara sugar (or brown sugar)
1/4 cup molasses
6 tablespoons water
1/2 teaspoon ground cinnamon
1 tablespoon salted butter

In a small saucepan, heat together the sugar, molasses, water and cinnamon over medium heat. Bring to a low boil and continue stirring until the ingredients are fully incorporated. Remove from the heat and whisk in the butter. Cool slightly. Transfer to a pitcher for serving or a glass jar for storing. Keep refrigerated and use within two weeks.

Makes a little over 3/4 cup of syrup.

Linking up with Farmgirl Friday and What I Am Eating.

Friday, November 15, 2013

Oatmeal Honey Wheat Bread


This is my absolute favorite sandwich bread! It's just a little bit sweet from the honey and the oats add a nice texture. Because it's half whole wheat flour and half bread flour, it's not real heavy either.

What really made it extra special this week was my new cast iron Camp Chef bread pan that I found at the C-A-L Ranch Store in Flagstaff this past weekend. I love cooking and baking in cast iron and I have been wanting a cast iron bread pan. Now that I'm baking just for us, I figured why not! It's even pretty with the decorative handles. :)


This one came pre-seasoned but I washed it before using it and seasoned it again. The way I care for all of my cast iron pans is to rinse with hot water and scrub with a nylon scrubbie as needed after using. I then apply a thin coating of olive oil on the inside of the pan and put it in the oven preheated to 350 degrees. Then, I turn off the oven and leave the pan in until cool, usually overnight. All of my cast iron pans now have an awesome "nonstick" finish! I thought the bread might stick just a bit because the pan was new but the loaf fell right out.

Oatmeal Honey Wheat Bread          **Click here to print this recipe**

1 cup lukewarm milk
2 tablespoons softened butter
3 tablespoons honey
1 1/2 cups whole wheat flour
1 1/2 cups unbleached bread flour
1 cup quick cooking rolled oats
1 1/2 teaspoons salt
2 teaspoons bread machine yeast OR 1 packet active dry yeast (If using active dry yeast, dissolve it in the warm milk before combining with the remaining ingredients.)

Mix, knead and let your dough rise until doubled using your favorite method; bread machine, manual or stand mixer. Shape dough into a loaf, put it in a greased pan, cover and let rise in a warm place until nearly doubled. Bake in a preheated 375 degree oven for 30 minutes, cover loosely with foil after 10 minutes to prevent over-browning. Remove from pan immediately and let cool completely on a wire rack.


Jerry commented that he thought this loaf even tasted better than usual...hmmm, must be the cast iron bread pan!

Disclaimer: I did NOT receive anything from anyone for this post, I just wanted to show off my new pan. ;)

Joining Farmgirl Friday, What I Am Eating, the From The Farm Blog Hop and Food On Friday the Bread Edition.

Thursday, October 31, 2013

Sharing Recipes for Extras


I really enjoy cooking from scratch and that includes making my own seasonings, sauces and such. It is comforting to know exactly what we are eating, right down to the extras, so I thought it might be nice to share links to some of my recent favorite finds.

Grace at Queen of the Red Doublewide has a great recipe for homemade Seasoned Salt that I use all the time. She also has a recipe for Homemade Seasoning for Breakfast Sausage that even works well with ground beef.

Since I shared a recipe for Seasoned Salt, how about the one I use for Seasoned Pepper? I have been using this recipe for so long that I don't even remember where I got it, I think from a magazine years ago.

We really like this recipe for Ragu Style Pizza/Pasta Sauce from Strangers and Pilgrims on Earth. I took her suggestion and made extra for the freezer. :)

I recently went searching online for a recipe for homemade enchilada sauce and found a truly wonderful recipe for Red Enchilada Sauce at gimme some OVEN. I can't believe how expensive canned enchilada sauce is, especially after learning how easy it is to make! Make sure to use chile powder and not chili powder in this recipe. Also, I used a milder chile powder (Tampico brand ground California chile pepper found at Walmart) for my second batch, the first was so hot we could hardly eat it.

Speaking of Chili Powder, I found a really nice recipe at The Kitchn awhile back. I left out the cayenne and coriander and reduced the chipotle powder to one teaspoon.

I have even tried a couple of homemade syrup recipes recently. This Molasses-Cinnamon Syrup from Simple Bites is heavenly and there are a couple of more yummy sounding recipes included in the link.

Two of my favorites that I have shared before are Homemade Flavored Coffee Creamer and Spreadable Butter. They are indispensable around here!

Do you like to make your own "extras" for cooking and baking?

Sharing with Farmgirl Friday and What I Am Eating.

Thursday, September 19, 2013

Pear Ginger Crisp


We harvested the fruit from our Kieffer Pear tree last week. We ended up with 20 pounds of pears from our little, 8-foot-tall dwarf tree! :)

I used some to make spiced pear jam in the slow cooker (works GREAT for the PB&J cookies), we have been eating them fresh, I gave some away and I used some to make this crisp last Sunday. What a lovely recipe! Between the maple syrup, fresh pears, dried cherries and oatmeal topping this is a fabulous dessert for fall!

The original recipe, from Simply Recipes, is for a pie but I didn't have time to properly chill the dough for the crust that afternoon so I decided to just go with a crisp. The only other change I made was to add about a cup of dried cherries, dried cranberries would be nice too.

The Bisbee Farmer's Market has a pie baking contest every fall and I put some of the pears in the refrigerator to keep so that I can enter this pie in the contest. Actually, I never told ya'll, but I WON the pie baking contest last year for a Peach Blueberry pie. It was my first week attending that market and, honestly, I was a little embarrassed about winning. LOL!!

Linking up with the Rurality Blog Hop, Farmgirl Friday and What I Am Eating.

Wednesday, September 11, 2013

I Pimped My Mixer!


So, I was watching the Food Network the other day (surprise, surprise!) and I was noticing all the specially painted/decorated mixers that these celebrity chefs have, like Ree Drummond, Alton Brown, Guy Fieri, etc. I was wishing I had one when I thought to myself, "Self, why don't you just add some stickers to your perfectly good, 20-year-old KitchenAid mixer to dress it up? That would make more sense than buying a new one!"


I have never claimed to be on the cutting edge of style or trends. After I got home from Wal-Mart, where I bought these cute, vinyl sunflower stickers, I looked online and found some really nice pimped out mixers and some cool tutorials, especially this one where the girl painted her mixer first. So, even though I'm behind the times, I thought I would show ya'll how cute my Farmgirl Mixer turned out and all it took was a $1 package of stickers! :)


Linking up with the Rurality Blog Hop and Farmgirl Friday.

Friday, September 6, 2013

Meatballs For The Freezer

This recipe came from my grandmother many years ago and I love having a batch of these babies tucked away in the freezer for those nights when I have absolutely no idea what we are going to have for supper. My grandmother always made them as baked Barbecued Meatballs but the possibilities are truly endless! I have used them for spaghetti and meatballs, meatball sandwiches and have even baked them plain and dropped them into a big pot of vegetable soup.
 
Meatballs
 
3 pounds ground chuck
2 cups oatmeal
2 eggs
1 cup chopped onion
13-oz can evaporated milk
2 teaspoons salt
2 teaspoons chili powder
1 teaspoon garlic powder
1 teaspoon black pepper
 
Mix well. Shape into balls (I use a cookie scoop). Place on a cookie sheet and freeze until firm. Package airtight in freezer bags or containers.

 
I used a combination of locally grown ground lamb and ground beef for this batch, adding some ground pork would be nice too. I also used my goat milk instead of canned milk.

Just take out however many meatballs you need for your meal, let them thaw, place in a baking dish and then top with your favorite sauce, or no sauce at all in the case of the meatballs for soup. Bake at 350 degrees for 40-50 minutes until done. I also like the fact that there is no browning on the stovetop and all the mess that comes with it but you could use them that way too.

I like them the way Grandma used to make them the best, smothered in some slightly sweet homemade barbecue sauce and served with some macaroni and cheese and a nice salad or green vegetable. Yum!! :)

Linking up with Farmgirl Friday and What I Am Eating.

Wednesday, August 21, 2013

Fruit & Nut Cookies


These cookies were inspired by a bar cookie recipe I used to make years ago. That recipe called for the addition of fresh banana and orange juice, which wasn't the way I wanted to go with these. I use a combination of dried blueberries, dried cherries and chopped dried apricots but any combination of dried fruit would be nice. The Apple Pie spice really adds a nice flavor and the dried blueberries are heavenly! A few of my die-hard Cowboy Cookie and Cowgirl Cookie customers at the Farmer's Market have actually switched and now buy these every week. ;)

Fruit & Nut Cookies

1 cup butter                         **Click here to print this recipe**
1 cup brown sugar
1/2 cup granulated sugar
2 eggs
1 teaspoon vanilla
2 1/2 cups Baking Mix
2 1/2 cups quick-cooking oats
1 1/2 teaspoons Apple Pie spice
2 cups diced mixed dried fruit
2/3 cup chopped pecans

Preheat oven to 375 degrees. In a large bowl, beat together butter and sugars until creamy. Add eggs and vanilla; mix well. Stir in the Baking Mix, oats and Apple Pie spice; mix thoroughly. Stir in the dried fruit and pecans. Drop by tablespoonfuls onto ungreased baking sheets.
Bake for 10-12 minutes until lightly browned.
Cool on baking sheets for a few minutes and then remove to racks to cool completely.
Makes about 4 dozen cookies.

Apple Pie Spice

4 teaspoons cinnamon
2 teaspoons allspice
1 teaspoon cardamom
1 teaspoon nutmeg

I use this Apple Pie spice in all kinds of baked goods, not just apple pie! Besides these cookies, I use it in fresh apple muffins and zucchini muffins for the Farmer's Market. It is also really nice in pancake or waffle batter with some pecans.

Sharing with the Rurality Blog Hop, Farmgirl Friday and What I Am Eating.

Update on Red:
He is still here and doing well. Jerry took him along this morning when he rode his horse out in the pasture and he did fine. We had to put him in the horse trailer last night since it was the only place we could think of that he couldn't escape from. Right now, he is actually sitting in the livingroom watching Gunsmoke with Jerry...

Wednesday, July 24, 2013

Freezing Potatoes

Have you ever had a potato go bad in the cupboard? A rotten potato smells worse than just about anything I know. Blech!!

I had one go bad in a bag of red-skinned potatoes this week, which is why I usually don't buy bags of potatoes this time of year. They just don't keep well during our rainy season. However, there was a really good sale on 5-pound bags of red-skinned potatoes and I just couldn't resist!

Luckily, I found a way to salvage the rest of the bag. I know lots of folks can or dehydrate extra potatoes but I didn't have that many and I wanted a quick and easy way to preserve these. I looked online and found lots of info on freezing mashed potatoes. Most recommended using red-skinned or Yukons in this instance because the Idaho (baking) potatoes get mushy/mealy when frozen as mashed potatoes. The next time I have extra Idaho potatoes, I'm going to try Grace from Queen Of The Red Doublewide's suggestion for homemade frozen hashbrowns. :)

For frozen mashed potatoes, just make your favorite mashed potato recipe and let cool a bit. Then, use an ice-cream scoop to portion out servings onto a cookie sheet lined with foil. This could also help with portion control. I don't know about you, but I tend to overeat when it comes to mashed potatoes, my ultimate comfort food. Yum!!


Put them in the freezer until they are frozen solid and then pop them off of the cookie sheet and put them into a freezer bag. To serve, remove however many portions needed and reheat them from frozen in the microwave. You could also thaw them overnight in the refrigerator and heat them in the oven.


Not only did I save the rest of the bag of potatoes but I now have a ready made side dish in the freezer for busy nights when time is short for cooking supper. My only problem with this was having to eat the extra potatoes that didn't fit on the cookie sheet. Yep, comfort food at it's finest. ;)

Linking up with Rurality Blog Hop, Farmgirl Friday and What I Am Eating.

Thursday, July 18, 2013

German Chocolate Cookies


The inspiration for this recipe came courtesy of my blogging buddy Carolyn at Krazo Acres. You can find her original recipe here. Thanks Carolyn, these cookies are awesome and I know they will be a big hit with my Farmer's Market customers!!

German Chocolate Cookies

1 cup butter, softened               **Click here to print this recipe**
1 cup brown sugar
1/2 cup granulated sugar
2 eggs
1 teaspoon vanilla
1/2 cup cocoa powder
3 1/2 cups Baking Mix
1 cup chopped pecans
1 cup sweetened coconut

Preheat oven to 375 degrees. In a large bowl, beat together butter and sugars until creamy. Add eggs and vanilla; mix well. Stir in cocoa powder and Baking Mix; mix thoroughly. Stir in pecans and coconut. Drop by tablespoonfuls onto ungreased baking sheets.
Bake for 10-12 minutes. I like them just a little on the softer side for more of a German Chocolate cake taste and texture.
Cool on baking sheets for a few minutes and then remove to racks to cool completely.
Makes about 4 dozen cookies.

Yum!! All I need now is a big glass of ice-cold milk! :)

Linking up with The Country Homemaker Hop, Rurality Blog Hop, Farmgirl Friday and What I Am Eating.

Thursday, May 30, 2013

Individual No-Bake Cheesecakes


We love cheesecake around here but I very rarely make it because we just don't need to eat the WHOLE thing! The April/May issue of MaryJanesFarm magazine had some recipes for mini cheesecakes made in 4-ounce canning jars. Well, that was too little so I used 8-ounce wide-mouth canning jars and it was just right! ;)

You could try different crusts and toppings to suit your tastes and what you have on hand. The thing that really impressed me was making a no-bake cheesecake without a tub of non-dairy whipped topping and I gotta tell you, this tastes sooo much better than the ones I remember from my youth that used the non-dairy whipped topping! It comes out light and fluffy and not too sweet.

 Crust                    **Click here to print this recipe**

1/2 cup graham cracker crumbs
2 tablespoons melted butter
1 tablespoon sugar

In a small bowl combine all ingredients. Divide evenly between four 8-ounce wide-mouth canning jars. Press lightly into bottom of jars.

Filling

4 ounces cream cheese, softened
1/4 cup sugar
1/2 teaspoon vanilla
1/2 cup heavy cream

In a medium bowl, combine cream cheese, sugar and vanilla; mix well. In a separate bowl, whip heavy cream until stiff; gently fold into the cream cheese mixture. Divide evenly between the jars.

Topping

2 cups fresh (or frozen and thawed) berries, I used fresh blackberries
1/4 cup sugar, or to taste
1 tablespoon cornstarch
2 tablespoons water
1/2 teaspoon vanilla

In a medium saucepan, combine berries, sugar, cornstarch and water. Cook and stir over medium heat until thickened and bubbly. Cook and stir for 2 more minutes. Remove from heat and stir in vanilla. Let cool completely before spooning over cheesecake filling in jars.

Top each jar with a lid and chill in the refrigerator for at least two hours before serving.

Joining the Country Homemaker Hop, Rurality Blog Hop, Pie*ography, Farmgirl Friday and What I Am Eating.

Thursday, May 16, 2013

Gilding The Lily - Multigrain Bread

 
Recently, I picked up the May 2013 copy of Cook's Country magazine, it has some awesome foodie photos and I'm always looking for ideas. One of the recipes that really caught my eye was for Dakota Bread, a lovely multigrain bread all dolled up with a generous coating of seeds over the top. I thought that it looked like something that would really sell at the Farmer's Market. :)

Once I read the recipe, I realized that it was very similar to the multigrain bread that I have been making for several years...as a loaf bread, as rolls and even as a free-form round loaf. This is one of my favorite breads for sandwiches for us and it sells but, honestly, it looked kind of boring. I decided to try "Gilding the Lily" by adding sunflower seeds, sesame seeds and poppy seeds over the top before baking and WOW, what a difference! Just that little extra attention to detail makes people look twice and (usually) buy some.

Multigrain Bread                         **Click here to print this recipe**

1 to 1 1/4 cups milk
2 1/2 tablespoons honey
2 tablespoons butter
1 1/2 teaspoons salt
1/2 cup 7-grain hot cereal (I use Bob's Red Mill)
3 tablespoons raw wheat germ
3 tablespoons oat or wheat bran
2 tablespoons bulgur wheat
1 cup whole-wheat flour
2 cups bread flour
2 teaspoons bread machine/instant yeast OR 1 packet active dry yeast (If using active dry yeast, dissolve it in the warm milk before combining with the remaining ingredients.)
1 egg beaten with a bit of water
Sunflower seeds, pumpkin seeds, sesame seeds and poppy seeds for the top (Use any combination you like)

Mix, knead and let your dough rise until doubled using your favorite method; bread machine, manual or stand mixer. Shape the dough into a smooth ball for a large loaf or divide the dough in half and shape each half into a smooth ball for smaller loaves. Place on a baking sheet, slash the top and let rise in a warm place until nearly doubled in size. Just before baking, brush top and sides with egg mixture and generously sprinkle with seeds of your choice.
Bake in a preheated 375 degree oven for 30 to 35 minutes until golden brown; cover loosely with foil after 10 minutes. Remove to a wire rack and cool completely.


Linking up with The Country Homemaker Hop, Farmgirl Friday and What I Am Eating.

Thursday, May 2, 2013

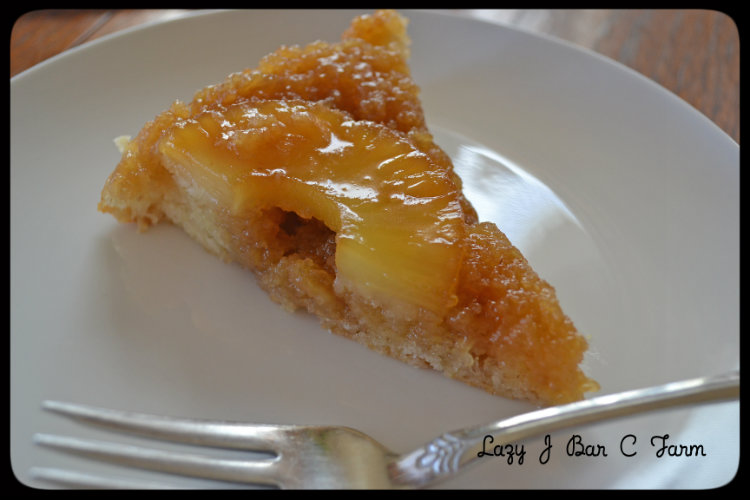
Pineapple Upside Down Cake


We love having pineapple with our homemade cottage cheese but it seems there are always a few pineapple rings left over. I have been using them to make Pineapple Upside Down cake. Oh, how we suffer! :)
I only had five leftover rings this time, one or two more would have been even better.
This makes a nice dessert, of course, but it is really, really good as a breakfast coffee-cake type thingy. YUM!!

Pineapple Upside Down Cake               **Click here to print this recipe**

Topping:
1/4 cup butter
1 cup brown sugar
6 or 8 pineapple rings from a 20-ounce can

Cake:
2 cups Baking Mix
1 cup sugar
1 cup milk
2 tablespoons melted butter

Preheat oven to 350 degrees.
Cut the 1/4 cup of butter into chunks and put it into a 10-inch cast iron skillet, put the skillet in the oven as it preheats to melt the butter. Remove the skillet from the oven and sprinkle the brown sugar evenly over the melted butter. Arrange the pineapple rings over the brown sugar.
Combine the Baking Mix and sugar in a medium bowl. Add the milk and melted butter and mix well. Spread the cake batter over the pineapple.
Bake for 35 to 40 minutes until golden brown. Remove the pan from the oven and run a knife around the edge of the cake. Carefully invert the cake onto a serving platter. It should come out easily.
Allow the cake to cool slightly before serving.

Under NO circumstances should you try to use your finger to push any dripping, molten hot syrup back onto the plate! ;)


Sharing with The Country Homemaker Hop, Farmgirl Friday and What I Am Eating.

Thursday, April 25, 2013

Pie*ography Thursday - 04/25/2013


I thought I would share another portable pie for Pie*ography Thursday this week. The inspiration for these actually came from some packaged goodies I saw recently at the grocery store. I liked the way they were braided and figured I could do that! I started with a little different pastry recipe and used some apple pie filling that I had in the freezer from last fall. I found this lovely post for an Apple Lattice Galette utilizing a Danish braiding technique and knew that that was the effect I was looking for.

Filling               **Click here to print this recipe**

3 pounds apples
1 cup sugar
2 tablespoons flour
1 teaspoon cinnamon
1/4 teaspoon nutmeg
1 tablespoon lemon juice

Peel, core and dice apples. Combine sugar, flour, spices and apples. Let stand until juices begin to flow, about 30 minutes. Stir in lemon juice. Cook over medium heat until mixture begins to thicken. Cool completely before using. Store any extra filling in the refrigerator and spoon it over waffles or pancakes. Yum!

Pastry

1 1/4 cups all-purpose flour
1/2 teaspoon salt
1/2 cup cold butter cut into chunks
1/4 cup cream cheese
1 tablespoon apple cider vinegar
2 to 3 tablespoons cold water

Mix the flour and salt in a mixing bowl. Cut the butter and cream cheese into the flour using a pastry cutter. The mixture should look like large crumbs and begin to cling together in clumps. Sprinkle the apple cider vinegar and cold water over the dough and with your hands, mix it in until the dough holds together adding more water if necessary. Roll out the dough to a 12-inch square. Cut into 4 six-inch squares. Follow the excellent directions for making a Danish Braid found here at the bottom of the post. Sprinkle liberally with cinnamon sugar and bake at 375 degrees for 20 to 25 minutes.


I guess part of my Pie*ography story is that I get bored making the same thing all the time for the Farmer's Market and I'm always looking for new ideas. These turn out really pretty even if they are a bit fussy. ;)


Pie*ography Thursday, Farmgirl Friday, What I Am Eating.