Lazy J Bar C

Lazy J Bar C
Showing posts with label Rural Thursday. Show all posts

Wednesday, November 28, 2012

Bread Making Tips

For something a little different today, I thought I would share some of the tips and tricks I've learned baking bread for the last several years for the Farmer's Market. If my loyal, repeat customers are any indication, I must be doing something right! :)
I do have to admit to another reason for doing this. Last week, I was checking some settings on my blog for a fellow blogger and happened to look at my blog's stats. It isn't something I normally do but it is sometimes interesting to see where people are "coming from" when they visit my blog. One of the traffic sources was Pinterest. I don't do Pinterest because I have a hard enough time keeping up with all the blogs I follow and, yeah, I know there is a LOT of really good "stuff" on there that I'm probably missing out on! Anyway, someone made a comment on a "Pin" of my Buttermilk Wheat Dinner Rolls that the dry/wet ratio seemed a little off. That got me to thinking of all the variables encountered when making bread: quality of ingredients, moisture content in butter, type of liquid used, humidity, altitude, temperature in the house, etc., so I thought I would do a post.


I use King Arthur Flour for all my baking. I have found it to be high quality and it produces consistent results. I also believe it helps make my baked goods just a little better than the competition so it's worth the extra money to me. If I was baking just for Jerry and I, I would use organic King Arthur flour or grind my own but that is cost/time prohibitive for my little business. The brand, and consequently the protein content, of the flour used can make a huge difference in how your bread turns out. Even something as simple as the moisture content in the brand of butter used or whole milk versus skim milk will make a difference. One thing that a bread baker has to learn is what the dough should look and feel like. I personally like my dough a little on the soft side, especially for rolls.

Sweet Potato Rolls

You can see in the above picture that the dough is very soft. I find that this makes for lighter, fluffier rolls. I also check the consistency of my dough a few minutes into the mixing/kneading cycle Every. Single. Time. I don't care if I just made a batch of Oatmeal Wheat Bread an hour ago and am starting another, I still check the consistency of the dough. If it seems a little dry, I add a tablespoon or so of water. If it is too wet and sticky, I add a little flour, one tablespoon at a time. I have found that I will need to adjust the amount of liquid (usually whole milk) in my recipes by almost 1/4 cup from summer to winter. The dough below is a little dry.

Black Pepper Parmesan Rolls

After adding about a tablespoon of water, it comes together and is nice and soft.
 
Black Pepper Parmesan Rolls
 
I have also learned that the recipes that use water instead of milk are stickier. When I go to shape a dough that is a little on the sticky side into rolls or bread, rather than adding more flour, I grease my hands and the counter just a tiny bit to prevent sticking and that way, the rolls or bread is still nice and light. My Pumpernickel Rye Bread dough always comes out sticky.

Another thing I have learned is to not let the dough overproof after shaping. It should only rise about one inch above the top of the pan.

Honey Wheat Bread

If it rises too much, it will collapse as it cools after baking and you will be left with a "wrinkly" top, like the one below. ;) It doesn't affect the taste and it usually doesn't affect how it sells but it just isn't as pretty. (sigh)

Onion Dill Rye Bread

Almost all of my bread recipes I have developed myself by taking other recipes and tweaking them to suit my needs, the ingredients I use and my altitude and humidity (mostly lack thereof!). So, the next time you are making bread, I hope you can use some of these tips to make the recipe your own and don't hesitate to adjust the amount of liquid and/or flour to make it work for you! Oh, and don't forget to take notes on any changes you make, they will come in handy later; you should see all the scribbles on some of my recipe cards! LOL!! Okay, gotta run, it's time to get back to the Onion Cheddar Rolls. It's cheese bread day here at The Home Bakery.
Linking up with The Country Homemaker Hop, Rural Thursday and Farmgirl Friday. I'm also featured on Dolly Is Cooking, thanks Dolly!!

Thursday, November 15, 2012

Super Simple Cottage Cheese


I love cottage cheese! It is one of my favorite lunches, whether with whole-berry cranberry sauce (homemade of course!), pineapple or a beautiful home-grown tomato. By the way, this tomato is from my friend's garden...bartering milk for vegetables is good! ;)
I used to buy a lot of cottage cheese before I got my dairy goats and even afterwards for awhile because all the cottage cheese recipes I tried never turned out all that great and, honestly, they were kind of a pain in the, well you know, to make!! It bothered me though to have to buy a dairy product that I ought to be able to make myself so I pretty much quit buying cottage cheese, that and the fact that I didn't like some of the "stuff" that was in most of the commercial cottage cheese.
Then, awhile back, I had one of those ah-ha moments while making a batch of Queso Blanco. After draining the whey from the curds and before putting it in the cheese press, I thought to myself "Self, this sure looks like cottage cheese to me!" So, I made sure it was drained really well, added a little salt, broke the curds up pretty finely and stirred in some heavy cream. Voila, cottage cheese! It is a little different than commercial cottage cheese but it tastes pretty good to us. :)
Now, I'm sure some of my fellow cheese-making blogging friends have been doing this for years but I thought I would share anyway, just in case there is anyone else out there who hasn't yet had the light bulb go off.
Sharing with The Country Homemaker Hop, Rural ThursdayFarmgirl Friday and the Farm Girl Blog Fest.

Thursday, November 8, 2012

Cowgirl Cookies


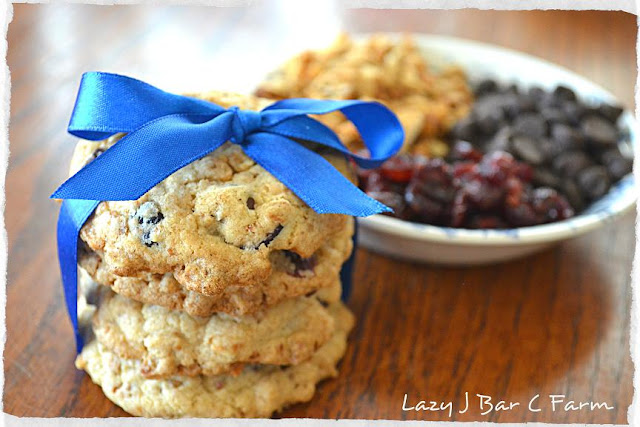
I have been trying to come up with a new cookie recipe for the Farmer's Market and I wanted to create a Cowgirl cookie to complement the popular Cowboy Cookies. I made a variation of oatmeal cookies using Chai Spice and adding coconut, dried cranberries and vanilla chips. It was okay but didn't have the Wow! I was looking for.

Then, the other day, Tammy at Our Neck of the Woods posted a recipe for Maple Brown Sugar Granola Cookies that got my creativity going. If you haven't visited Tammy's blog yet, you really should, it's great! Oh, and I admit to totally stealing her idea of tying a ribbon around the cookies for their photo shoot. (blush) I'm always on the lookout for food styling ideas, thanks Tammy!!

These cookies have the Wow! with the addition of the granola and the Chai Spice and what Cowgirl can resist dark chocolate and dried cranberries? I know a certain Cowboy who even gave them a thumbs up! ;)

Cowgirl Cookies                **Click here to print this recipe**

1/2 pound (2 sticks) butter, softened
1 cup brown sugar
1/2 cup granulated sugar
2 eggs
1 teaspoon vanilla
3 cups Baking Mix
4 cups granola, homemade or store bought (I used homemade)
1 1/2 teaspoons Chai Spice
1 cup dried cranberries
1 cup dark chocolate chips

Preheat oven to 375 degrees. Beat together butter and sugars until creamy. Add eggs and vanilla; beat well. Add Baking Mix, granola and Chai Spice; mix well. Stir in cranberries and dark chocolate chips; mix well. Drop dough by rounded tablespoonfuls onto ungreased cookie sheet. Bake for 10 to 12 minutes or until golden brown. Cool for one minute on cookie sheet then remove to wire rack to cool completely. Makes about 4 dozen cookes. I flattened each cookie slightly so they would spread out a little more.

Sharing with The Country Homemaker Hop, Rural ThursdayFarmgirl Friday and the Farm Girl Blog Fest.

Thursday, November 1, 2012

Thursday, October 25, 2012

PB & J Cookies


Move on over Cowboy Cookies, there is a new favorite cookie in town!
This recipe idea came from the Better Homes and Gardens Special Fall Baking issue which, by the way, has lots of fabulous recipes in it! :)
I have changed it a bit to utilize my Baking Mix. It is a basic oatmeal cookie with peanut butter chips stirred into the batter and a dollop of jam on top. We are not big jam or jelly eaters so I have been using up homemade jam I had in the cupboard. The picture above has two with plum and one with peach.

PB & J Cookies

1/2 pound (2 sticks) butter, softened
1 cup brown sugar
1/2 cup granulated sugar
2 eggs
1 teaspoon vanilla
2 cups Baking Mix
1 teaspoon cinnamon
3 cups old fashioned or quick cooking oats, uncooked
1 cup peanut butter chips
Jam or jelly

Preheat oven to 375 degrees. Beat together butter and sugars until creamy. Add eggs and vanilla; beat well. Add Baking Mix, cinnamon and oats; mix well. Stir in peanut butter chips; mix well. Drop dough by rounded tablespoonfuls onto ungreased cookie sheet. Make a depression in the top of each cookie and fill with about 1/2 teaspoon of jam or jelly of your choice. Bake for 10 to 12 minutes or until golden brown. Cool for one minute on cookie sheet then remove to wire rack to cool completely. Makes about 4 dozen cookes.
These have become THE cookie at the Farmer's Market recently. I even had a lady call me this week and order two dozen for this Saturday. I hope you give them a try. :)
Linking up with The Country Homemaker HopRural Thursday and Farmgirl Friday.

Thursday, October 18, 2012

Rural Thursday - 10/18/2012


When we were in New Mexico last week, we visited the Hubbard Museum of the American West.
Before you even enter the museum, you get to see sculptor Dave McGary's wonderful exhibit titled "Free Spirits at Noisy Water," a string of eight larger-than-life bronze horses bounding down a hillside.
The museum features Western and Cowboy artifacts, Native American artifacts, lots of saddles, wagons and transportation vehicles; as well as educational programming and a changing exhibition program.
Many years ago, when my parents first moved to beautiful southeast Arizona, there was a museum in nearby Patagonia called the Anne C. Stradling Museum of the Horse. I have often wondered what happened to it and all the wonderful items there. Well, Anne Stradling was suffering from poor health in the late 80s and contacted the Hubbards in an effort to find a new home for her massive collection. Her Museum of the Horse is now part of the Hubbard Museum in Ruidoso Downs, New Mexico, proving that it truly is a small world. :)
Linking up with Rural Thursday.

Thursday, September 27, 2012

Cranberry Cordial


My blogging buddy, Kathy at Moving On To The Past, recently did a couple of posts about making cordials and inspired me to dig out my recipe for Cranberry Cordial and one of the extra bags of cranberries I bought last year just for cordial making. Thanks Kathy!! :)

1 16-ounce bag cranberries
2 cups sugar
1 cup water
1 bottle vodka

Combine cranberries, sugar and water in a saucepan. Bring to a boil and cook 4 to 5 minutes, until skins start to pop. Cool berries completely and then place them in a half-gallon jar.

Add vodka and stir well. Allow mixture to infuse for at least a week stirring occasionally. I left mine for almost two weeks.

Strain cranberries into a bowl using a colander lined with cheesecloth. Use a spoon to press the good stuff out of the cranberries. Do NOT eat the cranberries, they are really potent! Ahem, don't ask me how I know. (hic!) Pour the cordial into a jar and then squeeze the cheesecloth to extract the last little bit of cordial. I got an extra 1/2 cup!

Make a simple syrup of 1 cup sugar and 1/2 cup water. Cool completely and then mix into the strained cordial. Allow to age for 2 to 3 weeks.


Pour into decorative bottles. Okay, I only had two decorative bottles but you get the idea! :) This makes lovely gifts for the holidays or an extra special after-dinner drink for you on those nippy fall and winter evenings.

Sharing with Rural Thursday and Farmgirl Friday.

Thursday, September 6, 2012

Vitex agnus-castus

This has got to be one of my favorite bushes/trees! Many years ago, I was studying herbal medicine of the Southwest and was given some Vitex seeds to be used to make a tincture. The next year, I had several volunteer plants coming up and I don't remember having the seeds outside at all! Ever since, I have considered this to be my special herbal partner. When the plants are small, they kind of resemble marijuana with their five-lobed leaves and I had to ask my herbal teacher what in the heck it was! :)


Vitex is a deciduous Mediterranean native hardy to Zone 7. It grows quickly and is easily started from seed. Here is a purple flowered plant that I dug up as a volunteer at a local nursery about six years ago. At first glance, it looks as though the ends of the branches are bare but those are the seeds that follow the flowers. There are a LOT of seeds on this one!


I bought a white flowered bush a few years later that we planted out front. It has done okay but it hasn't grown and thrived the way the purple one has; although, it did freeze to the ground during our 100-year freeze event in 2010 so I guess it's doing fine.


Then, last year, I had two volunteers come up in one of the barrels in the back yard. When they bloomed this year, the flowers were PINK!! Hmmm...I guess the plants cross pollinated. My plan is to transplant these two out near the garden to provide some shade and to attract more bees to the garden since they LOVE the flowers!


The pink flowers are just getting ready to open again. There is an initial heavy blooming period in late spring/early summer but they keep putting on more blooms as the summer wears on.


Not only are the plants beautiful when in full bloom but the seeds are used to make tinctures for womens' health issues covering all stages of life from puberty to menopause. Other names for the plant are Chasteberry Tree and Monk's Pepper because it is said to have an anti-aphrodisiac effect on men. When the seeds are fully ripe, they resemble black peppercorns.

Rosemary Gladstar's book "Herbal Healing for Women" and Susun Weed's book "Menopausal Years The Wise Woman Way" provide the following information:
Vitex has a stimulating effect on the pituitary gland, which, among other functions, regulates and normalizes hormone production. It also increases production of luteinizing hormones, enhancing the progesteron cycle. At the same time, it inhibits the release of the follicle-stimulation hormone FSH and normalizes the estrogen cycle. It is beneficial in treating painful and irregular menstruation, infertility, PMS, menopausal problems and other hormonal imbalances. No side effects have ever been reported from extensive and extended use. It is one of the most useful herbs for women. It is a slow-acting herb and results become evident only after two or three months of daily use; permanent improvements requires about a year of daily use but the results are worth it.


Linking up with Wildcrafting Wednesday, Rural Thursday and Farmgirl Friday.

Wednesday, August 29, 2012

Cowboy Cookies


Howdy ya'll! This here is a cookie that will satisfy them hardworkin' cowboys in your life. Why shoot, even the little buckaroos and buckarettes down to the Farmers' Market have told me, "Miss Candy, them are some mighty tasty cookies!" Just so's ya' know, these ain't no chicken-livered girly cookies. Nope, they're chock full of oats, raisins, chocolate chips and walnuts. They'll make ya' sit up and say "Yee-Haw!" Why, you could even grab one or two on the way out the door to see you through them early mornin' chores. I know my cowboy can go through several before the sun has even come up! ;-)

Okay, let's git down to bakin'!


Cowboy Cookies               **Click here to print this recipe**

1 cup butter, softened
1 cup brown sugar
1/2 cup granulated sugar
1 teaspoon vanilla
2 eggs
2 cups Baking Mix
1/4 cup unsweetened cocoa
2 cups uncooked quick or old-fashioned rolled oats
1 1/2 cups semi-sweet chocolate chips
3/4 cup golden raisins or regular
3/4 cup chopped walnuts

Preheat oven to 375 degrees. In a large bowl, beat butter and sugars until light and fluffy. Add vanilla and eggs; mix well. Add Baking Mix, cocoa and oats; mix well. Stir in chocolate chips, raisins and walnuts.
Drop dough by tablespoonfuls about 2 inches apart onto ungreased cookie sheet. I flatten the dough a bit as it doesn't spread very much.

Bake for 10 to 12 minutes or until bottoms are lightly golden brown. Cool on pan for 2 minutes, then remove to a wire rack to cool completely.

I haven't done an "ingredient" picture in awhile but I wanted to show off the new mixing bowl that I picked up at a thrift store in Willcox a couple of weeks ago. It is marked Robinson Ransbottom and probably isn't particulary old, the company was in business until 2005, but I have always wanted a heavy crockery mixing bowl and the price was pretty good! :)

Linking up with The Country Homemaker HopRural Thursday, Farm Fresh Friday and Farmgirl Friday.

Thursday, August 23, 2012

When Life Gives You Pumpkins...


...make Pumpkin Scones!! I sure hope ya'll aren't sick of scone recipes yet because here is another one! :)

I have been gifted several pie pumpkins in the past week or so and after cooking and pureeing the pumpkin, I decided to see how it would do in some scones. The pumpkin puree, an egg and some molasses were the only wet ingredients I used and I added some dried cranberries and vanilla chips. I also used my homemade pumpkin pie spice, you can find the recipe at the end of this post. (That reminds me, I need to make that Applesauce Molasses cake sometime soon!)

Pumpkin Scones

2 1/3 cups Baking Mix
1/3 cup sugar
2 teaspoons pumpkin pie spice
6 tablespoons cold butter
3/4 cup dried cranberries
3/4 cup vanilla chips
1/2 cup pumpkin puree
1 large egg
1 tablespoon molasses
Turbinado sugar for the tops

Preheat oven to 375 degrees.
In a medium bowl, stir together Baking Mix, sugar and pumpkin pie spice. Cut in butter until it resembles small peas; stir in dried cranberries and vanilla chips. Make a well in the center. In a separate bowl, combine pumpkin puree, egg and molasses; mix well. Pour the liquid ingredients into the dry and mix lightly until incorporated. Do not overmix.
Turn the dough out onto a lightly floured surface and knead gently for 4 or 5 turns. Roll or pat dough into a circle 7 inches in diameter. Cut into 6 or 8 wedges and place on a baking sheet. Make sure to leave enough room between the scones as they will rise a bit and spread out. Brush the top of each scone with a little heavy cream or milk and sprinkle with turbinado sugar.
Bake at 375 degrees for 18 to 22 minutes until golden brown.

I had some of these for sale at last week's Farmers' Market and they went fast, guess it's getting to be pumpkin season, my favorite time of year!

Linking up with The Country Homemaker HopRural Thursday, Farmgirl Friday and Farm Fresh Friday. Thanks ladies for hosting these wonderfully fun blog parties! :)

Thursday, August 16, 2012

Garlic Bread Pizza


There have been many commercials on the TV recently for Pizza Hut's Garlic Bread Pizza. Since the closest Pizza Hut is over 40 miles away and I just don't think they are going to deliver here, I figured making my own was going to be necessary! :)

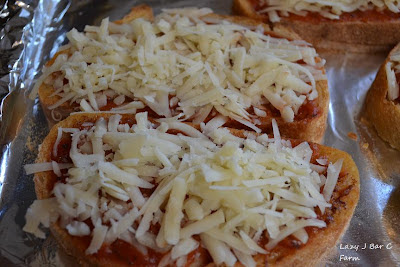
I started with a purchased rustic-style loaf of bread. I wanted the chewy texture so that it would hold up to the toppings. Spread with butter and sprinkle on some garlic powder and stick it under the broiler until golden brown.


Let it cool just a bit and then add your pizza sauce of choice.


Next, some shredded mozzarella cheese, a little or a lot - your choice!


Now, add your toppings. I just used sausage this time, I have also used pepperoni with bell peppers and onions.


Bake at 400 degrees for 10 to 12 minutes or until the cheese is lightly browned and bubbly.


This is so good, a lot quicker than making pizza dough, and you can make several different types so that everyone gets what they want. I guess it's a take-off on the old french bread pizzas but I like this version better as it is not as soggy.

Linking up with Rural Thursday and Farmgirl Friday.

Thursday, August 9, 2012

Extreme Makeover - PB&J Edition


I know what ya'll are thinking...how in the world can you possibly have an extreme makeover of something as ubiquitous as a peanut butter and jelly sandwich? Why, make all the components from scratch, of course! :)
I started with a lovely piece of lightly toasted 100% Whole Wheat bread, then I added a layer of homemade Peanut Butter, crunchy for me please, finally, I topped it all off with some of our favorite Carrot Cake jam/conserve (thanks, Michelle, for the recipe). To complete this lovely breakfast, just add a glass of icy cold, fresh, raw goat milk! YUM!!


Toasting the bread is optional but doing so makes the peanut butter all melty good. :) Talk about comfort food!
Linking up with Rural Thursday, Farmgirl Friday and Farm Fresh Friday.

Wednesday, August 1, 2012

First Of The Month - August

I'm joining Jan at Murrieta 365 for her First of the Month meme all this year. Here are the ground rules per her site: "The goal is to capture one thing repeatedly on the first of each month. It can be a landscape, a person, an animal, a project; whatever your focus is, is fine. It can even be a record of where you are each First of the Month."


Not really too much new to report on Miss Daphne this month. She is five months old now, growing like a weed, and her favorite pastime is eating! I'm going to have to add a couple more links to her collar before too long.


She still wants to be right by my side whenever I'm down in the pasture, which makes picture taking somewhat of a challenge. No matter how nicely I asked, she just would not jump up on the steps behind her for a photo session. ;-)


Here, she is trying to figure out how to get the chain off the gate so she can get out! LOL!!


I really love seeing the goats out in the pasture during the day.


I'm still working with Daphne every day - making her lead, getting her used to having her udder touched and just lovin' on her lots and lots, which is very easy to do because she is such a sweetie! I really love my goats and feel very fortunate to have such nice girls. :-)


Linking up with Rural Thursday too.

Thursday, July 19, 2012

Ginger Cream Scones


The scones have become very popular at the Farmers' Market! :) I make six or seven different types each week and always sell out. These are my favorites. They are spicy with ground ginger and chunks of crystallized ginger and the turbinado sugar on the top gives them a nice finish. This recipe uses my Baking Mix.

Ginger Cream Scones               **Click here to print this recipe**

2 1/3 cups Baking Mix
1/3 cup sugar
1 teaspoon ground ginger
Zest from one lemon
6 tablespoons cold butter
1/2 cup finely chopped crystallized ginger
1/2 cup heavy cream
1 large egg
Turbinado sugar for the tops

Preheat oven to 375 degrees.
In a medium bowl, stir together Baking Mix, sugar, ground ginger and lemon zest. Cut in butter until it resembles small peas; stir in crystallized ginger. Make a well in the center. In a separate bowl, combine heavy cream and egg; mix well. Pour the liquid ingredients into the dry and mix lightly until incorporated. Do not overmix.
Turn the dough out onto a lightly floured surface and knead gently for 4 or 5 turns. Roll or pat dough into a circle 7 inches in diameter. Cut into 6 wedges and place on a baking sheet. Make sure to leave enough room between the scones as they will rise a bit and spread out. Brush the top of each scone with a little heavy cream and sprinkle with turbinado sugar.
Bake at 375 degrees for 18 to 22 minutes until golden brown.

I buy my crystallized ginger (along with a lot of other herbs and spices) at Penzeys Spices. There is a store in Tucson and I just love going in there! Luckily for Jerry, there is a bench for the husbands to sit and wait while the wives are shopping. ;-) If you haven't ever been to one of their stores or looked at one of their catalogs, I recommend you do. Their products are wonderful and their prices seem reasonable too. Sorry for carrying on but I just wanted to share! LOL!!

Linking up with Rural Thursday, Farmgirl Friday and Farm Fresh Friday. Updated to share with Food On Friday at Carole's Chatter.

Thursday, July 12, 2012

In The Pasture

I really enjoy our morning walks through our friend's cow pasture. We usually always see something interesting, even if it's just the cows. :)
I like this girl because she is brown, the majority of them are black & white Angus. "How now, brown cow?"


Most of the cows were "hanging out" by the pond yesterday morning. We got .70 inches of rain on July 4th and there is actually water in the pond! These next pictures are of some of the young heifers that haven't been bred yet.


All of the cows are calving right now. We saw the Corriente cow with the big horns and her new calf the other day but did I have my camera? Noooo. Yesterday, I wanted to get a picture of the dogs swimming in the pond but they had already gotten out. When we go for our walks, any neighbor dog that is around goes with us! LOL!!


Number 12 seemed really concerned that we (and the dogs) were there. When we got back up the bank, we discovered why.


She is the proud mama of a new little calf! :)

Linking up with Rural Thursday and Farmgirl Friday.