Lazy J Bar C

Lazy J Bar C

Tuesday, January 31, 2012

Tuesday's Tails, #11

This week, Tuesday's Tails is going to the birds...some of the birds that hang out around the Lazy J Bar C that is!

First up are my favorites, the ravens. We have a pair that have been here for several years that hang out down at the barn. These birds are huge, every bit as big as the chickens! 


How do I know they are the same ones you ask? Check out this one flying away, he/she has a bad foot - you can see it hanging down in the picture.


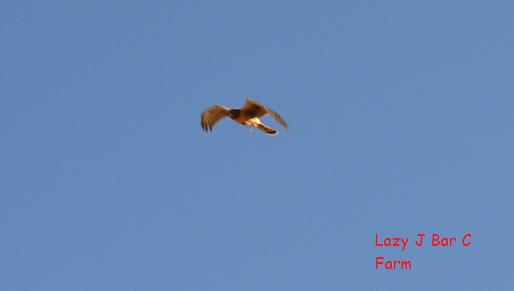
Next is another one of my favorites, the Swainson's hawk. I had never seen these guys around here until the past couple of years, usually only the red-tailed hawks. This one cruises over the barn every afternoon, glad I have wire over the top of the chickens' pen!


Next is the curve-billed thrasher. They like to build their nests in the cholla cactus. We had one build a nest in a cholla down near the barn two years in a row, it was fun watching the eggs hatch! Jerry finally had to dig up the cactus though because it got too big and the horse and goats kept getting stickers. This lady usually hangs out down by the chicken coop; although, yesterday, she was in the garden when I went out to take pictures of the sproutage. Sorry for the blurry picture but I wanted ya'll to see her yellow-orange eye.


Then she flew up on top of the chimney. She likes to sit up there and sing, she makes lovely sounds and I like listening to her but her song kind of echoes down the chimney into the fireplace and it drives the cats nuts! LOL!!


Also in the garden yesterday were the sparrows. I believe they are sage sparrows but I'm not 100% sure. These guys are only here during the winter, hmmm...does that make them snowbirds?!? LOL!!


And no post about birds in the high desert would be complete without a picture of a roadrunner doing what roadrunners do best...running across the road! This one is a young bird, they can get quite a bit bigger than this. In the summer when the lizards are hanging out up here around the house, we see a LOT of roadrunner activity as lizard is one of their favorite meals.


That's it for this week's Tuesday's Tails, I hope ya'll enjoyed hangin' out with the birds! :)

Monday, January 30, 2012

Cool Weather Crops

Woo-Hoo! I got out in the garden last Monday and got some seeds in the ground! Not everything I was hoping for but quite a bit. I still have to get some lettuce and spinach planted. Here are the "before" pictures of the beds prepared for planting.

I have one cabbage that made it past the grasshoppers and birds from last fall so I planted more cabbage and cauliflower in this bed.


This bed is planted with collard greens for the chickens.


This bed is planted with turnips, rutabagas, beets, radishes and snow peas along the trellis in the back of the picture.

I watered everything well and then covered with plastic to help the seeds germinate.


The other half of this bed I planted with broccoli.


Today, we have sproutage! YAY!!


I really haven't been gardening for very long and it always gives me a sense of satisfaction and thrills me deep in my soul when I plant seeds and they grow into wonderful FOOD that will nourish our bodies! Nature is truly amazing!

I'm linking up with Heidi and her Country Garden Showcase at My Simple Country Living.

For all of you who think you can't garden in the dead of winter (like we can here in the high desert), check out my previous post Grow Your Own Sprouts. Talk about a "gardening" project with almost immediate gratification! All these lovely sprouts took less than a week to grow! :)

Hand-Made Pay It Forward! Pass It On! Don't Pass It Up!!

Kaye from Giggles and Raspberries did a post last week for Hand-Made Pay It Forward 2012. She inspired Susan at e-i-e-i-omg to pass it on and Susan, in turn, inspired Tombstone Tidings to pass it on and she, in turn, inspired me to pass it on. Whew, that was a LOT of passing it ons! I hope I can inspire some of you to participate in this really cool idea!

So, here are the two rules:
1.  I promise to make something and send it (before the end of 2012) to the first five people who comment on this post.
2.  If you are one of the first five, you must promise to re-post the rules on your blog (or even Facbook) and send something to the first five people who comment on your post. The item must be hand made by you and the recipient must receive the gift before the end of 2012. The item may be as simple or as complicated as you would like. You just have to promise to follow through.

That's not too tough and it gives me an "excuse" to make stuff! I see all these neat ideas for crafty things and have trouble justifying to myself the need to make them but if I can give them away to you guys, YAY!

Anyway, I hope some of you also think this sounds like fun and leave a comment below to join in! :)

Friday, January 27, 2012

Bakin' Bacon


A few years ago, I saw someone (can't remember who but it was probably Paula Deen) on Food Network bake their bacon in the oven instead of frying it or cooking it in the microwave. I figured I would try it since I hate frying bacon because it makes such a big mess, and it never really comes out the way we like it - crispy - cooking it in the microwave. I always bake the bacon now and it's always crispy, it tends itself while baking - you don't need to turn it - and clean up is pretty easy!

I took one of my old cooling racks and relagated it to just the bacon bakin' rack (you have to say that REAL fast - bacon bakin'). I line my cookie sheet with foil too for easier clean up.


Just line up your bacon slices on the rack and bake at 350 degrees for 30 to 40 minutes depending on the thickness of your bacon and how crispy you like it.


It always turns out perfectly cooked, it doesn't curl up and like I mentioned, no turning or fussing required which leaves you free to concentrate on the rest of the meal!


If you want to save your bacon grease just let it cool a bit and pour it into your container. As for clean up, if you put some hot water on the rack for a few minutes it cleans up pretty easily. It doesn't even need to be completely submerged in the water.

I hope you try bakin' bacon the next time you fix it, I highly recommend it! :)

Linking up to the Farmgirl Friday Blog Hop hosted by Deb at Deborah Jean's Dandelion House and Heidi at My Simple Country Living.

Thursday, January 26, 2012

Thankful Thursday, #4

Today, I am thankful for...


...the ibuprofen and homeopathic sinus medication that is keeping me going with what I hope is just a head cold! LOL!!

Wednesday, January 25, 2012

Rye Bread - Three Ways

We love rye bread here at the Lazy J Bar C and eat it often! I make at least six different types of rye bread to sell at the Farmer's Market. This is my basic rye bread recipe that I can "change up" to get different varieties. The picture below shows Onion Rye on the left, Caraway Rye in the back and Dill Rye in the front. These three are very consistent sellers and the Onion Rye makes for a killer patty melt!


Rye Bread

1 1/4 cups milk
2 tablespoons butter
2 tablespoons sugar
1 1/2 teaspoons salt
2 1/2 cups bread flour
1 1/2 cups medium rye flour
2 teaspoons bread machine yeast OR 1 packet active dry yeast (If using active dry yeast, dissolve it in the warm milk before combining with the remaining ingredients.)

Now here is where you can vary the type of rye bread you are making.
Add 1 tablespoon caraway seeds
OR 3 tablespoons dried chopped onion
OR 1 tablespoon dried dill weed and 1 tablespoon dried dill seed

For today's post, I'm featuring the Dill Rye shaped into half loaves. The half loaves have become very popular at the Farmer's Market, people like being able to mix and match two types of bread or just buy a small loaf if they are single or have a smaller family. I have found that when most people say they don't like rye bread it's really the caraway seeds that they don't like. This Dill Rye has no caraway seeds just lots of lovely dill flavor.


Mix, knead and let your dough rise until doubled using your favorite method; bread machine, manual or stand mixer. Shape into a loaf and place in a greased 9 x 5 x 3-inch bread pan. I love the "feel" the rye flour gives to the dough, totally different than using all wheat flour.


Let the dough rise in a warm place until nearly doubled.


Bake in a preheated 375 degree oven for 30 minutes or until done. Cover loosely with foil after about 10 minutes to prevent over browning.


No matter which version you make, this bread has a lovely light texture and slices beautifully. It's funny, living here in the desert southwest, I can find Masa flour all day long but I have to buy my rye flour at a health food store! LOL!!

One of these days, I will post the recipe for the dark Pumpernickel Rye and Jerry's favorite, the Scandinavian Rye with fennel, caraway, dried orange peel, molasses and buttermilk! :) I'm linking up to The Country Homemaker Hop with Heidi at My Simple Country Living.

Tuesday, January 24, 2012

Tuesday's Tails, #10

This week I thought I would share pictures of some of the critters who have been visiting us at the Farmer's Market recently.

A lady had five of these Golden Laced Polish roosters for sale. She brought them on two separate occasions and finally sold them all this past Saturday. My friend Sharon took this picture for me with her cell phone, thanks Sharon! The lady was carrying this guy around like a baby and he kept falling asleep in her arms! LOL!!


A couple of weeks ago, we had the "Three Amigos" come and visit. They are three young wethered Alpacas. They were all perfectly groomed and beautiful until they decided to roll in the loose, dead grass!


One of the vendors occasionally brings one of their Pygmy goats for the children to pet but I don't have pictures yet. We also always have vendors and customers who bring their dogs. Most of them are very well behaved but there is one who likes to chase the poor little goat!  I need to remember to take my camera every week so I can capture all the animal happenings at the Farmer's Market.

Monday, January 23, 2012

Pruning the Fruit Trees - Finally!

We finally got out yesterday and pruned the dwarf fruit trees. Sadly, I must admit that this is the first time we have done it since we planted them as bareroot stock in 2007. The first few years, they didn't really need it and last year I just never got around to it. The pear and plum trees were getting too tall and the peach tree had so many branches and leaves that there was no light getting to the fruit inside to ripen it. The taller tree to the left is a Carpathian walnut tree and it is supposed to be tall so I didn't mess with it. We actually got seven walnuts off of it this past year! :)


When I go back and look at the pictures, it is kind of hard to tell we actually did anything on the pear and plum trees!

Kieffer pear before

Kieffer pear after

The silly pear tree is budding out already! I'm not sure what kind of yield we will get this year, I don't think we have had enough chill hours.

Santa Rosa plum before

Santa Rosa plum after

The height of the plum tree is now even with the top of the fence but it's hard to tell with the Vitex in the background. I cut about two feet off the top.

Peach before

Peach after

The peach tree was given to us so I don't know the variety but it bears the biggest, juiciest, freestone peaches and it is only about 4-1/2 feet tall! YUM!

I certainly hope we did our pruning right and that it helps the trees be more productive. I'm linking up with Heidi's Country Garden Showcase at My Simple Country Living.

Friday, January 20, 2012

Appliqued Wall Hanging


I had so much fun making the appliqued Christmas Moose Pillow awhile back that I wanted to do another small project. The original design was from Qweenee Quail Quilts. I'm not a quilter but I do like to piece the tops. One of the reasons I made the moose into a pillow was so that I didn't have to worry about quilting or binding the edges! LOL!!

Well, this time I wanted to make a little wall hanging as a gift for one of my friends. The directions were kind of vague..."quilt as desired"..."bind the edges as desired!" I didn't actually quilt it but rather did the applique stitches through all the layers for the quilting. The picture showed a 1/4-inch wide binding but I think if I make another one, I will go for a 1/2-inch wide binding. I used the same material as the body of the chicken for the backing and I added the pewter buttons to hide my "less than perfect" corners! ;-) I wanted to do a chicken so I designed the chicken applique myself. All in all, I'm happy with how it turned out and I sure hope my friend likes it! Linking up to the Farmgirl Friday Blog Hop with Heidi at My Simple Country Living and Deb at Deborah Jean's Dandelion House.

Thursday, January 19, 2012

Thankful Thursday, #3

Today, I am thankful for...


...my beautiful Alpine doe, Madeline, and all the lovely milk she gives me every day! I always make sure I tell her "thank you" when we are finished milking and give her extra lovin'. This is the milk she gave me this morning.

Wednesday, January 18, 2012

New Baking Sheet


Jerry's mom gave me a gift certificate to Bed, Bath & Beyond for Christmas and I knew one of the things I wanted to get was a new baking sheet for my bread business so that I would have two nice ones. I wanted another Chicago Metallic 12 x 18-inch heavy duty baking sheet. I bought one last year at a different Bed, Bath & Beyond. Of course, they didn't have any when I went looking! I wasn't too sure about the USA Pans, what with the corrugated bottom and the silicon coating, but it was the heaviest weight 12 x 18-inch baking sheet they had so I figured, what the heck! When I was checking out, the cashier told me how much she loved her pans like this so I thought maybe it would be okay.

Here is what USA Pans says about the coating on their website "AMERICOAT© Plus is a clear non-stick, environmentally friendly coating that is specifically formulated for superior baking and does not contain any PTFE’s or PFOA’s."


I have been using my new pan for a couple of weeks now and I absolutely LOVE it! It bakes evenly and nothing sticks! If you are in the market for new baking pans, I highly recommend USA Pans AND they are Made In America! :) I know I will be looking for some muffin pans, cake pans, loaf pans, a hearth bread pan, mini loaf pans, etc., etc...

Just so you know, nobody at USA Pans knows who I am (or cares!) and I was not compensated in any way, shape or form for this testimonial. I just love this pan and wanted to share with all of you! I'm linking up to The Country Homemaker Hop with Heidi over at My Simple Country Living.

Tuesday, January 17, 2012

Tuesday's Tails, #9


A couple of weeks ago, T-Bone and Shorty went back home. The youngest daughter is back from Texas and Shorty is her horse and she will make sure both are taken good care of. Anyway, we were thinking of getting another horse as a pasture mate for Jerry's horse, Paco. There is a horse auction in Benson on the second Saturday of each month so Jerry went this past weekend to see if he could find anything. Well...you can see what he came home with!! I was blown away when he told me what he bought! A miniature donkey and her 7-month-old foal!! We weren't even sure if the foal was a jack or a jennet until this morning. LOL!! Meet Esmeralda (mom) and Mercedes!

Esmeralda
I had to keep backing up to get her picture!

Mercedes
We didn't know much about miniature donkeys until we bought these girls. We always thought they had been bred down to mini size but they are actually normally this size and are originally from the Mediterranean. They are naturally friendly towards people. We noticed! LOL!!


They don't like dogs (just ask Buddy, they chase him!) BUT they do not make suitable livestock guardians, they just aren't big enough to fight off predators. We used to have a standard size donkey but one of the horses we had at the time was picking on him so we gave him to some friends of ours who have two little kids and the kids just love him! I have missed my donkey and the braying ever since. Jerry said that was one of the reasons he decided to buy these girls, that and they won't eat much! ;-)


When I went down to the pasture a few minutes ago to give the chickens their treats, Esmeralda saw me coming and she started braying so I called them and they both came a runnin' to get some scritches behind their ears! Sigh...I'm in love already!

Monday, January 16, 2012

Winter Kale

I got absolutely NOTHING done in the garden this past week! In my defense though, Jerry's mom was here visiting. What?!? It sounded like a good excuse to me! LOL!!
I did get some seeds ordered and they should be arriving sometime this week.
I wanted to link up with Heidi's Country Garden Showcase this week so I thought I would show ya'll some pictures of the beautiful kale that is just about the only thing growing in my garden right now. We don't eat it as often as we should but the chickens are always happy to see me coming with some greens! :) Maybe I'll get around to making some Zuppa Toscana this week.


I think they are pretty enough to deserve their own post! :)